티스토리 뷰
이번에는 스프링부트와 타임리프로 웹애플리케이션을 개발할 때
컨트롤러로부터 매핑되어 뷰페이지에 보여지는 내용을 AJAX로 처리하는 방법에 대해서 설명하고자 한다.
바로 이전의 포스팅에서는 사용자가 정보를 입력하고 입력을 선택하면 , 값을 저장한 후 그 값이 반영된 목록을
화면이 전환되어 보여지도록 하였다.
그러나 화면 전환없이 바로 같은 화면에 보여지도록 하려면 AJAX를 사용하여야 하는데
fragment라는 것을 사용하여 원하는 부분에 가져오도록 설정을 할 수 있다.
우선 test7로 요청을 했을 때 처리하는 컨트롤러와 뷰페이지를 생성한다.
|
1
2
3
4
5
6
7
8
9
10
11
12
13
14
15
16
17
18
19
20
21
22
23
24
25
26
27
28
29
30
31
32
33
34
|
package com.joyhong.controller;
import org.slf4j.Logger;
import org.slf4j.LoggerFactory;
import org.springframework.stereotype.Controller;
import com.joyhong.domain.Book;
import com.joyhong.service.BookService;
@Controller
public class TestController2 {
private Logger logger = LoggerFactory.getLogger(TestController.class);
@Autowired
private BookService bookService;
public String test7(Model model, Book book) {
return "test/test7";
}
}
|
|
1
2
3
4
5
6
7
8
9
10
11
12
13
14
15
16
17
18
19
20
21
22
23
24
25
26
27
28
29
30
31
32
33
34
35
36
37
38
39
40
41
42
43
44
45
46
47
48
49
50
51
52
53
54
55
56
57
58
59
60
61
62
63
64
65
66
67
68
|
<!DOCTYPE html>
<head>
<meta charset="UTF-8">
<title>Insert title here</title>
</head>
<body>
<div>
<h3>AJAX 사용</h3>
<p>책 정보 입력</p>
<form id="form" th:object="${book}">
<table border=1>
<tr>
<td>책제목</td>
<td>
<input type="text" th:field="*{title}" placeholder="책 제목을 입력하세요">
</td>
</tr>
<tr>
<td>저자명</td>
<td>
<input type="text" th:field="*{creator}" placeholder="저자명을 입력하세요">
</td>
</tr>
<tr>
<td>출판사</td>
<td>
<input type="text" id="publisher" name="publisher" placeholder="출판사명을 입력하세요">
</td>
</tr>
<tr>
<td>출판연도</td>
<td>
<input type="text" th:field="*{publishedYear}">
</td>
</tr>
</table>
<button type="button" onclick="inputData(this)" >입력</button>
</form>
</div>
<div id="list">
<th:block th:if="${bookMap != null}">
<h3>책 목록</h3>
<table border=1>
<tr>
<th>번호</th>
<th>제목</th>
<th>저자</th>
<th>출판사</th>
<th>출판연도</th>
</tr>
<td th:text="${book.creator}"></td>
<td th:text="${book.publisher}"></td>
<td th:text="${book.publishedYear}"></td>
</tr>
</table>
</th:block>
</div>
</body>
</html>
|
웹브라우저에서 test7로 요청하면 test7.html을 클라이언트에 보내주도록 하였다.
그리고 입력 버튼을 선택하면 처리할 스크립트는 book.js 파일에 별도로 작성하였다.
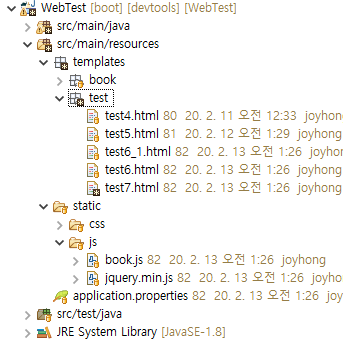
js, css, img 파일을 넣어두는 위치는 src/main/resources/static 아래에 넣어두면 된다.

jquery.min.js는 웹에서 다운로드하여 프로젝트 추가하였다.
book.js는 아래와 같다.
|
1
2
3
4
5
6
7
8
9
10
11
12
13
14
|
function inputData(){
var book = $('#form').serialize();
$.ajax({
url: "/home/test7_1",
data: book,
type:"POST",
cache: false
}).done(function (fragment) {
$("#list").replaceWith(fragment);
});
}
|
test7.html에서 id가 form인 것을 serialize해서 test7_1로 요청하도록 하였다. 이때 POST 방식으로 폼데이터에 입력한 값을 넘기도록 하였다. test7_1과 매핑되는 컨트롤러로부터 결과를 받으면 id가 list 인 곳에 결과로 넘어온 내용을 replaceWith 하도록 하였다.
위와 같이 코딩한 후 실행을 하면

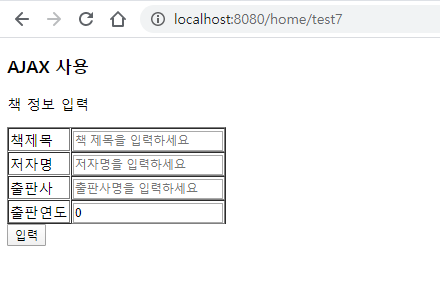
이런 간단한 입력 폼이 나오게 된다.
그럼 이제 입력을을 눌렀을 때 book.js에서 설정한 바와 같이 test7_1을 처리하는 컨트롤러를 생성하도록 한다.
|
1
2
3
4
5
6
7
8
|
public String test7_1(Model model, Book book) {
bookService.createBook(book);
model.addAttribute("bookMap", bookService.readBookAll());
return "test/test7 :: #list";
}
|
위에서 test7을 입력한 바로 아래에 test7_1을 위와 같이 코딩하면 되는데 여기서 중요한 것은 두가지가 있다.
첫번째는 book.js에서 넘겨받은 data 즉, $('#form').serialize() 로 넘겨받은 데이터는 Book book에 매핑되어지는데 이를 서비스로직에 보내어 저장하도록 한 뒤 모델 객체에 bookMap으로 전체 책목록을 넣는 것이다.
두번째는 반환값으로 문자열을 지정하였는데 그 값은 test7.html로 다시 원래 페이지를 지정하였고 뒤에 :: #list를 붙여
fragments를 지정해 주었다.
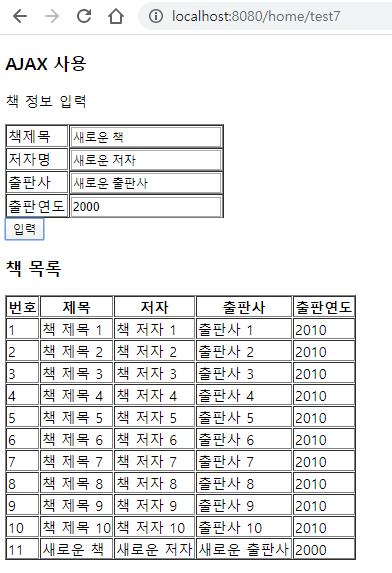
이렇게 되면 test7.html 43번 라인투버 63번 라인까지가 전환되어 새로운 책목록으로 변경되어진다.

'SpringBoot+Thymeleaf' 카테고리의 다른 글
| Validation 체크하기 (0) | 2020.02.20 |
|---|---|
| 타임리프로 뷰페이지 만들기 - Form (폼) (0) | 2020.02.17 |
| 타임리프로 뷰페이지 만들기 - 기본 문법 (0) | 2020.02.12 |
| Controller 생성하기 (0) | 2020.02.11 |
| 업무로직 만들기 (0) | 2020.02.10 |
- Total
- Today
- Yesterday
- sparql
- 사이퍼
- Knowledge Graph
- 지식 그래프
- networkx
- 트리플 변환
- django
- LOD
- TopBraid Composer
- 지식그래프
- cypher
- 타임리프
- Neo4j
- Thymeleaf
- TDB
- 장고
- 트리플
- Linked Data
- RDF
- Ontology
- RDF 변환
- pyvis
- property graph
- 온톨로지
- stardog
- 스프링부트
- TBC
- rdfox
- neosemantics
- 그래프 데이터베이스
| 일 | 월 | 화 | 수 | 목 | 금 | 토 |
|---|---|---|---|---|---|---|
| 1 | 2 | 3 | 4 | 5 | 6 | 7 |
| 8 | 9 | 10 | 11 | 12 | 13 | 14 |
| 15 | 16 | 17 | 18 | 19 | 20 | 21 |
| 22 | 23 | 24 | 25 | 26 | 27 | 28 |
